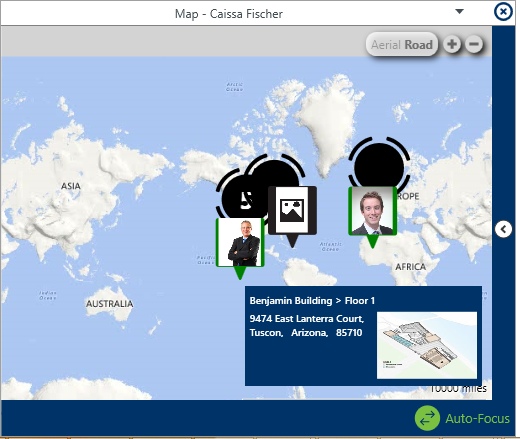
The map provides a visual representation of dispatches, officers, tasks, and saved locations. You can move around the map by clicking and dragging, by clicking the + or – icons to zoom in or out, or by clicking officer, organization, task, or dispatch pins on the map. You can choose a default location and zoom level for the Map panel by configuring your Account Settings.
 The Map panel.
Clicking on a pin will reveal that location’s address details and the floorplans of any of its indoor locations in the blue box to the bottom right of the panel, while clicking on a location pin for a location that has indoor location points will reveal the floor plans of the master location and its indoor location points. You can move through the indoor location levels by clicking the  icons on the images and you can return to a previous level or the master location by using the tabs in the top-left of the panel. If a temporary pin has been placed by a dispatcher to indicate the exact location of a current dispatch, it will appear as the
  icon on the image. The color of these temporary pins is determined by the color selected for the dispatch’s priority, if any.
If more than one location is clustered together on the map, clicking the  icon will display a pop-up menu that you can click to select the location you wish to view.
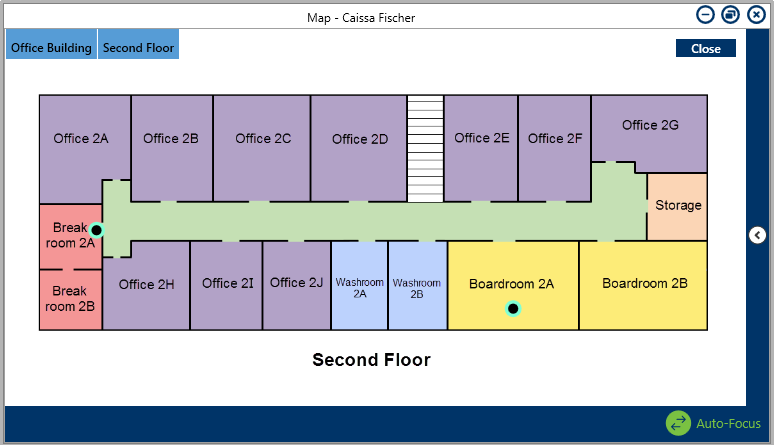 The Map panel displaying an indoor location point. Clicking the green icon on an image will move you to the next indoor location level, while clicking the tabs in the top-left will return you to the previous indoor location or the master location.
If Connect devices have been mapped to the location, the  (Access Control) and/or
  (Camera) icon(s) will appear on the location’s image.
You can also perform additional functions by clicking some of the icons (pins) that appear in the panel. These icons include:
| Icon | Function |
|---|---|
| Indicates that there are multiple pins in this area that could represent an officer, task, dispatch, and/or location. Zooming in on the map or using the filters to narrow down which pins are displayed will reveal each individual pin. If there are multiple locations clustered within the pin, clicking this icon will reveal a pop-up menu that you can click to select the location you wish to view. |
| A location pin. If a photo is uploaded to that location, a thumbnail will appear in the pin. A number will appear on the pin to indicate the number of dispatches and/or officers currently in this area. Hovering your cursor over this pin will reveal the name of the location, the number of any dispatches and tasks at the location (e.g. City Center [location name] 2 [number of dispatches] (3) [number of tasks]), and any officers at this location. |
| A temporary pin on a location image placed by a dispatcher to indicate the exact location of a dispatch. These pins are placed by double-clicking a location image when creating or editing a dispatch. The colors of the pins are determined by the color selected for the dispatch’s priority, if any. |
| Indicates an indoor location is saved within this location. Clicking this icon will reveal the indoor location. |
| An officer pin that displays the current location of the officer. This location is determined by setting the officers location in the Officers panel or Command Line. If the officer is using the Officer Mobile app and location tracking is activated on their mobile device, the pin on the map will show their location based on the GPS coordinates pulled from their phone. If a photo has been uploaded to that officer’s profile, a thumbnail of that image will appear on the pin. Hovering your cursor over this pin will reveal the officer’s last known location, the number of dispatches and tasks at that location (e.g. City Center [location name] 2 [number of dispatches] (3) [number of tasks]), as well as the officer’s name and call sign. The color of the pin reflects the visual alert settings created for the officer’s current status. In this example, the pin is green, indicating the officer is currently Available. |
| Indicates an Access Control device from Connect has been mapped to the location. If Connect sends an alarm or creates a dispatch for an activity logged by this device, the icon will flash the color assigned to the dispatch’s priority. The icon will not flash if the priority has no assigned color or the dispatch no longer has a New status. |
| Indicates a Camera device from Connect has been mapped to the location. If Connect sends an alarm or creates a dispatch for an activity logged by this device, the icon will flash the color assigned to the dispatch’s priority. The icon will not flash if the priority has no assigned color or the dispatch no longer has a New status. |
| An Unassigned task pin. Hovering your cursor over this pin will display a description of the task. |
| An Assigned task pin. Hovering your cursor over this pin will display a description of the task. |
| An On Route task pin. Hovering your cursor over this pin will display a description of the task. |
| An On Scene task pin. Hovering your cursor over this pin will display a description of the task. |
| A Cleared task pin. Hovering your cursor over this pin will display a description of the task. |
| A New dispatch pin. Hovering your cursor over this pin will display the dispatch number and, if your administrator has created a visual alert for the dispatch’s selected priority, that priority’s visual alert color will be displayed in the pin. |
| An Unassigned dispatch pin, indicating there are unassigned tasks for this dispatch. Hovering your cursor over this pin will display the dispatch number and, if your administrator has created a visual alert for the dispatch’s selected priority, that priority’s visual alert color will be displayed in the pin. |
| An Assigned dispatch pin, indicating there are assigned tasks for this dispatch. Hovering your cursor over this pin will display the dispatch number and, if your administrator has created a visual alert for the dispatch’s selected priority, that priority’s visual alert color will be displayed in the pin. |
| An On Route dispatch pin, indicating there are tasks with an On Route status. Hovering your cursor over this pin will display the dispatch number and, if your administrator has created a visual alert for the dispatch’s selected priority, that priority’s visual alert color will be displayed in the pin. |
| An On Scene dispatch pin, indicating there are tasks with an On Scene status. Hovering your cursor over this pin will display the dispatch number and, if your administrator has created a visual alert for the dispatch’s selected priority, that priority’s visual alert color will be displayed in the pin. |
| A Cleared dispatch pin, indicating there are cleared tasks for this dispatch. Hovering your cursor over this pin will display the dispatch number and, if your administrator has created a visual alert for the dispatch’s selected priority, that priority’s visual alert color will be displayed in the pin. |
| Switches the map from Aerial to Road view and vice versa. |
| Zooms the map in or out. |
| Appears to the far right of the panel and reveals the panel’s filter options. You can filter what appears on the map by Tasks, Officers, Dispatches, and Location. Click the arrow icon again to close. |
| When auto-focus is enabled in the Map panel, selecting a dispatch, officer task, organization task, or officer will automatically focus on the location of that dispatch, task, or officer on the map. This icon appears greyed out when auto-focus is disabled. |
| Allows you to choose if the panel is floating, dockable, or hidden. Selecting Auto Hide will hide the panel until your cursor hovers over a newly created tab at the left of the window. This icon appears at the top right of the panel. |
| Closes the panel. |