This panel displays a summary of active dispatches. You can double-click an activity to open the view its details or single-click a dispatch then click certain icons in the ribbon, such as Details, SOP, Create Task, or Location to perform additional actions.
To open Dispatches in a floating panel, click  Dispatches in the ribbon.
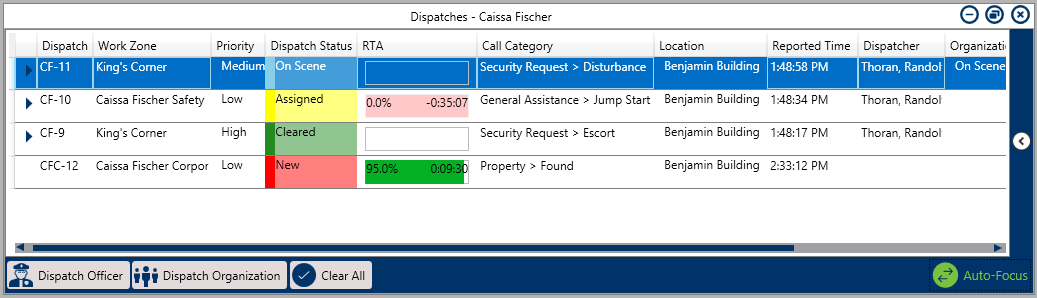 The Dispatches panel.
The columns in the Dispatches panel display details about the current activities. Clicking on any of these columns (except Reported Time) will arrange the dispatches alphabetically by the information contained in those columns. You can also show or hide the columns by right-clicking a column, then selecting or de-selecting the checkboxes that represent the columns. These columns include:
- Dispatch: The dispatch’s number. This number is automatically assigned to a dispatch once the record has been created.
- Work Zone: The area within the operational zone where the dispatch is occurring. An operational zone is a large area within your organization and work zones are smaller areas within the operational zone where the officers will be working. For example, the East Campus of a university is the operational zone and the Cafeteria, Laboratory, and Library are the work zones within that campus.
- Priority: The level of urgency/importance of a dispatch (e.g. High, Medium, or Low).
- Dispatch Status: The status of the dispatch, which can be New, Unassigned, Assigned, On Route, On Scene, and Cleared.
- RTA: Short for Regulated Time to Act, this column displays a timer that indicates the amount of time a dispatch has change the status on a specific type of dispatch. If the appropriate status change hasn’t occurred in the time allowed, the timer will flash red and begin counting the amount of time that’s passed since the RTA expired. Hovering your cursor over this column then clicking the
 icon will reveal the RTA Details window. In this window, the RTA column displays the RTA criteria, Planned indicates the time allowed, and the +/- column indicates the time left or how much time has passed since the RTA expired. If no RTA has been created for the dispatch, this column will be blank.
 The RTA Details window.
- Call Category: The type of dispatch, (e.g. Burglar Alarm, Theft, Emergency, etc.).
Location: The location of the activity.
Reported Time: The time and date the activity was created. Clicking this column will arrange the dispatches by the date/time the dispatch was created.
Dispatcher: The name of the dispatcher who created the activity and/or officer tasks.
Organization Status: The status of an organization dispatched to the activity, including Responding, On Scene, or Cleared.
SOP: Indicates if a dispatch has a Standard Operating Procedure (SOP) associated with it by displaying the
 icon. Clicking this icon will open the SOP panel.
Service Requests: Indicates if a dispatch has received a request from an organization to complete a dispatch-related task by displaying the
 icon. Clicking this icon will open the service request details.
Description: A description of the dispatch.
 icon will reveal the RTA Details window. In this window, the RTA column displays the RTA criteria, Planned indicates the time allowed, and the +/- column indicates the time left or how much time has passed since the RTA expired. If no RTA has been created for the dispatch, this column will be blank.
 icon. Clicking this icon will open the SOP panel.
 icon. Clicking this icon will open the service request details.
You can also perform additional tasks by clicking the icons that appear throughout the panel. If you need select multiple dispatches to perform bulk actions (e.g. close multiple dispatches), you can do so by holding down the Ctrl or Shift key, selecting the dispatches, then clicking the appropriate icon. These icons include:
| Icon | Function |
|---|---|
| Dispatches an officer on the selected dispatch and creates a non-specific task with a Respond and assist description. This icon appears after clicking a dispatch to select it. |
| Dispatches an organization on the selected dispatch. This icon appears after clicking a dispatch to select it. |
| Opens the conversation related to the dispatch and adds the currently logged in user to that conversation. |
| Assigns an officer to a specific task. This icon appears after clicking the |
| Allows you to select a new officer to a previously assigned task. This icon appears after clicking the |
| Changes the status of all started organization and officer tasks within a selected dispatch from On Route or Responding to On Scene. This icon appears after clicking a dispatch with one or more On Route or Responding tasks. |
| Clears all officer and organization tasks within a selected dispatch. This icon appears after clicking a dispatch with one or more tasks. |
| Changes the status of an Assigned task to On Route. This icon appears after clicking the |
| Changes the status of On Route tasks to On Scene. This icon appears after clicking the |
| Changes the status of On Scene, On Route, Assigned, or Unassigned tasks to Cleared. This icon appears after clicking the |
| Suspends a started task and creates a duplicate task that is automatically assigned to the originally assigned officer. This function is used when an officer must divert his or her attention away from a task that was already started. This icon appears after clicking the |
| Closes a selected dispatch. Dispatches with uncleared tasks cannot be closed. |
| When auto-focus is enabled in the Dispatches panel, a dispatch will automatically be highlighted when a dispatch or task item is clicked on the Map or an officer task is selected in the Officers panel. Additionally, if open, the selected dispatch’s details will appear in the Details window. This icon appears greyed out when auto-focus is disabled. |
| This arrow appears next to a dispatch when there are officer and/or organization tasks for that dispatch. Clicking this icon will reveal the tasks and allow you to change their statuses. |
| Appears on the far right of the panel. Clicking this icon will reveal the panel’s filter options, which include Work Zone, Dispatch Status, Priority, or Organization Status. Click the arrow icon again to close the filter options. |
| Allows you to choose if the panel is floating, dockable, or hidden. Selecting Auto Hide will hide the panel until your cursor hovers over a newly created tab at the left of the window. This icon appears at the top right of the panel. |
| Closes the panel. |


 icon next to a dispatch and selecting an Unassigned task.
 icon next to a dispatch and selecting an Assigned task.


 icon and selecting an assigned task.
 icon and selecting a started task.
 icon and selecting a task.
 icon and selecting a task with an On Route or On Scene status.